Showing posts with label Sewing. Show all posts
Monday, August 20, 2012
DIY Crib Sheet

Monday, May 14, 2012
DIY Slipcovered Ottoman
One of the things that I desperately wanted in the nursery when we were in the early stages of nighttime feedings with Thomas was a side table - to put all the glamourous new to breastfeeding accessories on. We picked a small dresser for T's changing table, and there wasn't a ton of room next to the changing pad for my massive water bottle, lanolin, a book or my phone for when I finally got him attached so I could read something, etc. But I never found a table small enough to work in the small nursery.
So for nursery version 2.0, a side table/footrest was on the agenda. I intended to make a pouf, but then I realized that if I found an inexpensive cube storage ottoman I could slipcover it and use the storage...and it would probably be more solid for my water bottle at 3am. I found this brown square ottoman at Target for $25. It was small, a good height to work as both an ottoman and a side table - and a climbing gym for T - depending on my needs at the time, and inexpensive. And being brown, it would have technically worked in the room, but it felt stark to me and I wanted to soften it a bit.
Please excuse the bathtub Lobster taking up residence on the chair arm. "Obster" wanted to read stories with us the other day.
Slipcovers for ottomans are so easy - same process I used with the living room ottoman, though my sewing skills have improved since I made that (ever so slightly, but improvement is improvement). This 15 x 15 ottoman took me about an hour because I was being precise with my pinning and measurements (something new for me). Aside from a little bit of fenagling at the corners, it's pretty much straight lines. I love that the stripe brings the turquoise, green and yellow of the pillow and cribskirt together, but ties the brown of the upper portion of the wall and quatrefoil on the curtains in, too.
We're nearing the end of the the nursery re-do - crib's next on the list, and then I have to figure out what to put on the walls - but I think we'll wait until McKiddle arrives for that and let their sex/name/personality influence that. Though, that was my plan when I originally did the nursery for Thomas - and that never happened. We all know wall art's never been my strong suit.

Tuesday, April 5, 2011
DIY Placemats into Pillows
Last year I was going to replace all of our outdoor cushions. Remember that? Well, I didn't do it. But I did stumble across Target's outdoor collection a few weeks ago and bought four placemats to make lumbar pillows for our patio. I love the style of our outdoor chairs, but they aren't comfortable. But the cost to outfit the chairs with all new cushions would be absurd - we'd easily replace the chairs with comfortable ones for the same price.
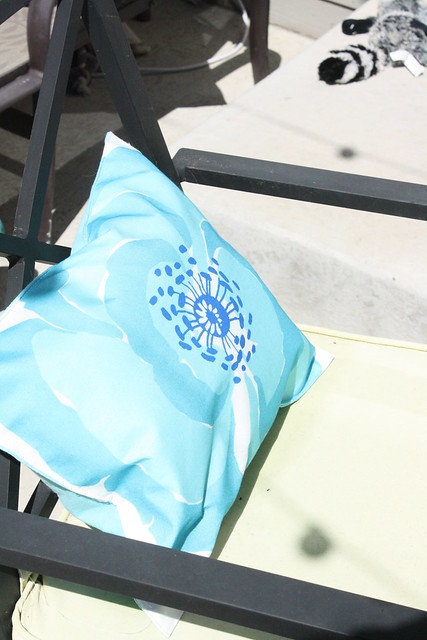
It's easy to make a pillow out of a placemat. I ripped the seam out of one short side of the placemat, stuffed the innerds of a big bed pillow ($2 at Target) into each one, and did a quick straight stitch to sew them back together.
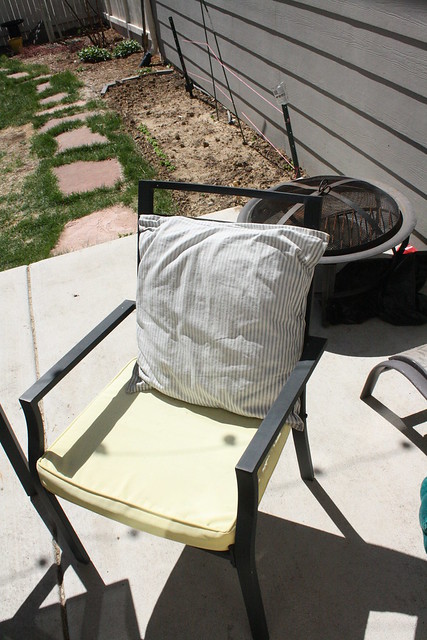
Here's a chair with an old, faded ticking pillows we were using to make the chair more comfortable.
And the outdoor placemats turned pillows.
How's your outdoor space coming along? The kegerator's full (because there's still a little 19 year old frat boy left in 80 year old B) and the chardonnay's chilling - come on by for happy hour anytime.
It's easy to make a pillow out of a placemat. I ripped the seam out of one short side of the placemat, stuffed the innerds of a big bed pillow ($2 at Target) into each one, and did a quick straight stitch to sew them back together.
Here's a chair with an old, faded ticking pillows we were using to make the chair more comfortable.
And the outdoor placemats turned pillows.
We spend a lot of time on the back patio in the spring and summer - B and I will have the occasional happy hour and deconstruct our workdays/projects/events/latest dramatic situation on warm afternoons while Thomas plays in his jumperoo or we'll turn on the lights and play Gin Rummy or Scrabble after Thomas is in bed. Because we're pretty much 80 years old - and we wouldn't have it any other way. Just think of how awesome we'll be at being 80 when we really get there.
Tuesday, February 8, 2011
Giveaway: Spring Inspired Pillow
I've never done a giveaway on the blog for a couple of reasons. The first is that I decided I'd only do giveaways of products or items that had some direct relation to my blog, and many of the giveaways I've been approached about don't fit that criteria. The second reason is that, with those criteria it makes sense to giveaway things I make, but I'm Little Miss imperfect and I always worried no one would enter.
But, I made this pillow after I posted about the pillows I made Emily and decided to give a giveaway at imperfect a try. Nothing fancy, just a lumbar pillow covered in a fabulous spring fabric - browns, greens, blues and yellows - that just so happens to be available in napkin form at Target.
All you need to do to enter (I'm taking this cue from the fabulous Laurel who used these requirements for a giveaway once) is leave a comment complimenting the person who comments before you. If they have a blog, compliment them on their blog. If they don't, say something nice and warm and loving. If you're the first to comment, just leave a little love note for someone who inspires you. It's the season of love, friends. Let's share it!
If you are or want to become a follower of my blog for a second entry, please leave a second comment letting me know you follow the blog.
Giveaway ends at 11:59 pm Mountain on Thursday, February 10th. 2 days - anything longer and I'll forget about it. My memory's on the fritz - I call Casco "Thomas" about six times a day.
Thanks friends! Looking forward to it!
Wednesday, February 2, 2011
Pillow Talk
My best friend, Emily, bought a townhome last year. I always intended to make her something for her house, but last year I was not in a crafting mood. So for her birthday this year, I tackled throw pillows for her living room. Last summer, Emily picked her colors - brown and blue are pretty much her story. So I knew I wanted to make big pillows in a blue linen fabric. And when I found the fabulous print that pulls together the blue and the brown, I knew it was meant to be.
I love the flowered pillow. I scoured every fabric store within 20 minutes of my house and ended up buying a set of napkins at Target to make this.
It's not unlike this pillow from Pottery Barn, just has brown to tie Emily's colors together.
It was a fun and pretty easy project once I found all of the material.
Please ingnore the wrinkles. Irons and I don't get along.
I love the flowered pillow. I scoured every fabric store within 20 minutes of my house and ended up buying a set of napkins at Target to make this.
It's not unlike this pillow from Pottery Barn, just has brown to tie Emily's colors together.
It was a fun and pretty easy project once I found all of the material.
Monday, August 16, 2010
Coffee Break
Well, it lasted eight months. The painted coffee table, that is. The white was refreshing at first, but I painted it quickly and improperly and peeling white paint was not refreshing. And I was ready for a change - the table's always been a few inches too tall to be a comfortable coffee table.
Plus, we have a good number of friends with toddling toddlers and when they're over I cringe whenever a head gets too close to a table corner. Add to that the fact that my niece is mobile now - and I love her precious head and don't want Auntie Em's coffee table to be the story behind her first scar - and that Thomas will be mobile in the blink of an eye - and that I love his precious head and don't want to add any more scars to it - and I figured that going with an upholstered coffee table was not a bad move.
I had grand plans - transforming a gross old coffee table into a beautiful cocktail ottoman that the world would ooh and ahh over. I told B about my plans, and Mr. Coupon responded, "We have an ottoman, Em" and pointed at the green storage ottoman that matches B and Casco's belfoved big green chair and was currently residing in the office. I was dismissive. "Noooo. That's not what I'm talking about - I don't do matchy matchy." Well, I hunted Craigslist and Thrift Stores for the old coffee table that I could alter to no avail until I decided to just move the ottoman in one day to see what it looked like. Perfect height. Perfect shape. Pretty perfect for my imperfect taste. I vow never to dismiss Mr. B's decorating advice again. Hold me to that, interpeeps.
But, I still don't do matchy matchy, so I turned to fabric. I was determined to go bold - to move out of my solids with the occasional stripe comfort zone. And bold turned out to be an octagonal green. I'm in love.
For about $28 worth of fabric, we have a whole new look for the room. The sewing was a simple box slipcover - no sweat for a good sewer, a few naptimes long project for me. And I can switch it up pretty frequently at that price - a slipcover for each season if I get bored.
The best thing about it is that we can just wheel it up to the couch or chair to serve as an ottoman when it's not needed as a coffee table - we never had room for it to be used as an ottoman when the old coffee table was in the room. The McKevitt boys are big fans of this new functionality.
An area rug that's the appropriate scale for the room is next on the neverending list of things to do for this room.
Tuesday, July 13, 2010
The Bag Lady
And I do mean that in the absolute nicest sense of the term!!! Have you all made the blog acquaintance of my cousin Liz? She's sweet, smart, a fabulous mom and just so happens to be a gifted seamstress to top it all off.
In October, Liz gave me a fabulous bag. Seriously, fabulous. When I used it for the first time three separate people stopped me in the mall to ask where they could get one. And the compliments haven't stopped.
Photo from wemholman.blogspot.com
But, with last month's addition to the family, I needed to retire my day to day bags for something with structure and pockets. And Liz surprised me with a fabulous baby gift - a gorgeous diaper bag, a diaper caddy, a nursing cover and matching burp rags.
The diaper bag and its accessories made their debut at the boob group at the hospital and I had lots of questions about it. I'm waiting for Liz to open an etsy store, but in the meantime I'm loving that this sweet, talented and generous lady chose to marry into our family!
Friday, June 25, 2010
Gift-a-palooza
I had a goal to get summer gifts - for at least June and July - done before the baby arrived. We had two kid birthday parties in June on weekends sandwiching my due date. So I knew I'd be 1) Hugely pregnant or overdue 2) In labor or 3) The mother of a newborn for the parties. So the gifts needed to be ready to go and easy to grab quickly or send with a friend to the parties (and one still needs to be delivered - sorry Jenna!).
Last year for these girls' birthdays I ran to Laurel for ideas, so I figured I'd do the same this year and copy her Birthday Tote Bags. I personalized canvas totes with each girl's initial and filled the bags with coloring books and crayons and fun items that they can use and then throw away.
The "m" turned out better than the "a", which I'm fine with - I figure the "a" looks sort of vintage and taught me what not to do before I started on the "m". It's all about imperfection over here.
Edited to Add: Sorry I forgot the integral "how-to" portion, my mind! I bought Avery t-shirt transfer paper (I've tried other transfer papers in the past and Avery is my favorite) and printed out mirror images of the letters (in this font - one of my favorites for projects like this) on the transfer paper and just ironed them onto the bags. The key difference between the A and the M - for the M I used a pillowcase between the transfer paper and the iron and got a much crisper transfer than when I put the iron directly on the transfer paper for the A.
Last year for these girls' birthdays I ran to Laurel for ideas, so I figured I'd do the same this year and copy her Birthday Tote Bags. I personalized canvas totes with each girl's initial and filled the bags with coloring books and crayons and fun items that they can use and then throw away.
The "m" turned out better than the "a", which I'm fine with - I figure the "a" looks sort of vintage and taught me what not to do before I started on the "m". It's all about imperfection over here.
Edited to Add: Sorry I forgot the integral "how-to" portion, my mind! I bought Avery t-shirt transfer paper (I've tried other transfer papers in the past and Avery is my favorite) and printed out mirror images of the letters (in this font - one of my favorites for projects like this) on the transfer paper and just ironed them onto the bags. The key difference between the A and the M - for the M I used a pillowcase between the transfer paper and the iron and got a much crisper transfer than when I put the iron directly on the transfer paper for the A.
Friday, April 16, 2010
T-shirt Take 2
I love my purple t-shirt. The woman sitting behind us at the Rockies Game last Saturday who I can't crop out of our picture? Not so much love. She talked for the entire game (on a seemingly first/blind date) about Facebook . Painful - call me crazy, but I prefer to talk strikes and pitch count at baseball games.
So, the company it kept on its first wear aside, I love my t-shirt. So I embellished and dyed another one.
This time I just sewed a simple corsage out of scraps of another old white t-shirt, and dyed the entire thing my signature green.
For the dying: I use RIT dye - powder or liquid but I prefer the liquid. For both of this shirt and the last one, I was only dying one thing at a time, so I used an old mixing bowl, hot water and the dye. This method (and I think the fabric of both of these t-shirts) produces a marbled dye effect, which I'm okay with. But I'll be trying some thicker t-shirts to see if they get a more even dye effect soon.
So, the company it kept on its first wear aside, I love my t-shirt. So I embellished and dyed another one.
This time I just sewed a simple corsage out of scraps of another old white t-shirt, and dyed the entire thing my signature green.
For the dying: I use RIT dye - powder or liquid but I prefer the liquid. For both of this shirt and the last one, I was only dying one thing at a time, so I used an old mixing bowl, hot water and the dye. This method (and I think the fabric of both of these t-shirts) produces a marbled dye effect, which I'm okay with. But I'll be trying some thicker t-shirts to see if they get a more even dye effect soon.
Monday, April 12, 2010
Patio Furniture Update - Part 1
This is our patio set. I bought the table and four chairs on Overstock.com three years ago for about $150. I love the style of the furniture - it was not unlike the Pottery Barn Potrero set available at the time but on a smaller scale. It's held up well and fits our patio perfectly.
The only problem is that the chairs have never been comfortable - and I'm biased against any X-back chair design now as a result. B and I have adjusted for our own outside dining purposes, but we always feel guilty having guests sit there. The cushions that the chairs came with have seen better days and I've never been a fan of the yellow - so I decided that this would be the year to revamp the chairs.
So, I'm going to cover the existing cushions in white now that the yellow has faded. And then I need to make something for the backs.
So here's the question: Do you prefer matching chair cushions with an attached seat and back?
Sound off on your preferred look - I don't have a favorite as long as the chairs become sitable for our dinner guests.
See, there are our dead grass patches. Just in case you were feeling ripped off last week.
The only problem is that the chairs have never been comfortable - and I'm biased against any X-back chair design now as a result. B and I have adjusted for our own outside dining purposes, but we always feel guilty having guests sit there. The cushions that the chairs came with have seen better days and I've never been a fan of the yellow - so I decided that this would be the year to revamp the chairs.
So here's the question: Do you prefer matching chair cushions with an attached seat and back?
Or, do you like the look of a seat cushion and a coordinating (or matching) throw pillow for the back?
Sound off on your preferred look - I don't have a favorite as long as the chairs become sitable for our dinner guests.
Subscribe to:
Posts (Atom)